I’ve had to do some experimenting to create the magnets I’ve been sending out to Free Little Art Galleries. I tried different construction techniques and I’m here now to say what works and what doesn’t.
What I’ve been making is a photo print stuck to lightweight backing material, the print having a border that wraps around the edges to the back, so you don’t see the edges of the backing material. This technique works for rectangular shapes; I discuss other shapes below.
What do you want as a result?

We want a picture on the front and magnet on the back. What about the edge? My goal was to create something with a little depth to it and a edge with a color coordinating with the image, more like a tile than a sticker.
If that’s more complex than what you want, you can find magnetic printer paper and just print your artwork right on it (note: that’s an affiliate link).
Assuming you want to do something like what I do, read on.
Printing the artwork
Paper choice
Recently, I’ve been finishing my magnets with a coat of Mod Podge (matte) for protection. For this purpose, I prefer to print on light-weight glossy photo paper. HP Everyday Photo Paper gives good results.
If you don’t want to Podge the work, a matte photo paper works best. I got the Office Depot brand. The image is sharp, the colors are accurate, the surface doesn’t take fingerprints, and it looks good in all light conditions. But if it gets wet or dirty it’ll be spoiled, and the corners also tend to crack a little when you fold it around the foamboard, so I don’t make them like this anymore.
I also tried sticker paper. I couldn’t find a sticker paper with good color reproduction, but that would be easier to assemble if you can find one that works for you.
Layout
Here’s the template I use to print the artwork, made using free Inkscape software. The margins fold around and over to the back of the backing material, which turns the upside down text right side up. The 5/16″ tabs on the back, I found were the narrowest I could glue down easily.
If you like, add a QR code of your own. I’ll leave it to you to arrange the images to avoid wasting paper, but here are a few tips:
- “Group” all the entities that represent one magnet. This makes it easy to treat them as a unit for purposes of positioning and rotation.
- You can go right up to the edge of the paper if you put a “blank” foldover tab there. It saves a cut and it doesn’t matter if a little bit doesn’t print because it’s too close to the edge, because you have part of the slanty line to guide you.
- Use the “snap nodes, paths and handles” feature of Inkscape to get edges to align perfectly. If two magnets touch along an edge, there are fewer cuts.
Construction
My backing material is foamboard. It’s very light, stiff enough, cuts cleanly if you use a sharp blade, and it’s easy to glue things to the front and back. I imagine balsa wood or cork might work, but I haven’t tried them. Bookboard (used for book covers) would probably be fine, but I expect it’s expensive (it’s also thinner, so you’d have to adjust the template). Coroplast isn’t good because its slight ridges are often visible on the surface of the artwork. Mat board (for picture framing) might be too bendy given the force you have to use to pull the magnets off a surface.

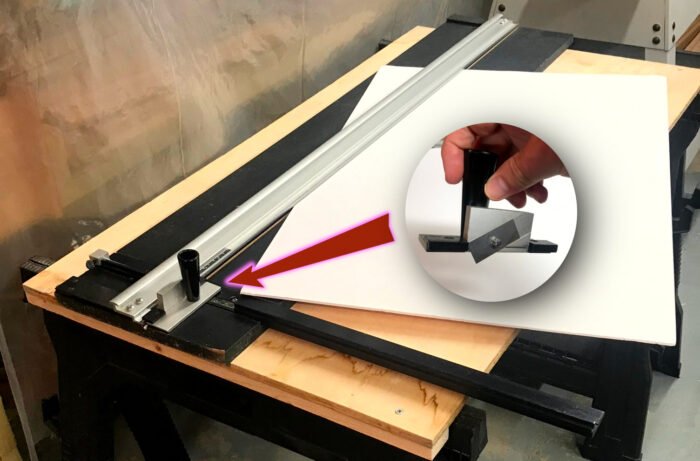
I use a mat cutter to cut the foamboard neatly. This is a tool used in picture framing to cut mat board in nice straight lines. I found an old one on Craigslist for $15. Sweet! It’s hard to cut the edges straight enough otherwise. The cutter will usually have a ruler or two marked on it to position the stops that your material rests against, and a rail you press down on the material to hold it in place while you cut. The blade is mounted on a shuttle that rests on the edge of the rail, so you can pull it through the material in a straight line.
I make the backing about 1 mm smaller than the artwork to allow for the thickness of the paper and allow for some small imprecision in cutting or positioning. The blade needs to be nice and sharp or you’ll get ragged edges as it pulls on the foam.

Pre-crease the folds in your printed artwork using something with a sharp corner, preferably of less than 90 degrees. I made a “folding wedge” tool for this purpose. Use a table or other flat surface to fold the paper around the sharp edge, not too far so you don’t create another crease around the next corner of the wedge.
I use Elmer’s glue-stick to secure the artwork to the “front” side of the foamboard. I tried other adhesives but many show through the artwork. I find I don’t need to wait for it to dry. I do press it down firmly before moving to the next step. Use a generous amount of glue here if you plan to apply a protective coat later, because the paper may bulge up in spots when it soaks up water from the sealant if there are large areas not glued down.
When I fold the flaps around to the back of the foamboard, I use superglue to glue them down. This sets almost instantly. Of course, as advertised on the package, it also bonds skin instantly. It takes a little practice to get down just the right amount of glue to secure the edge without gluing yourself to the art. I’m careful to apply pressure from the outside of the piece, not touching the foamboard, so any glue that squeezes out doesn’t reach my fingers. Because it sets up so fast, I hold the piece perpendicular to a table when pushing the flap into place, to make sure the corners are right angles when the paper first makes contact with the foamboard.
For magnets, buy “magnetic tape” in rolls. This has adhesive on one side, with a backing you peel off to stick the flexible magnet to your piece. It can be cut to length with scissors. Two half-inch wide strips as long as they can be without overlapping the paper are more than strong enough to make it stay in place on a fridge. You don’t want to make it too hard to pry off because foamboard is squishy if you squeeze it hard enough. The magnet is intended for hanging the artwork, not as an industrial strength note holder.
Alternatively, if you have a big sheet of magnavinyl, you can cut your own even strips with the mat cutter. If you do that, “tacky glue” is good for sticking the magnavinyl to the backing material. Use just a little glue, and put some weight on it while it sets up — a thick hardcover book works well.
Finish
I protect the surface of the finished work with Mod Podge Matte (affiliate link). Gloss would probably work fine also.
Failed experiments
I started out using regular photo paper on corrugated plastic. It’s really hard to make this stick properly. Even when I pre-creased the paper, it wants to flatten out and will pull loose from any liquid glue — even tacky glue. I had to clamp it, and the glue takes forever to dry, it’s hard to clamp it gently enough to not leave a line on the front, the glue squeezes out and sticks to whatever you use to clamp it with, gets on everything.
I tried using a hot glue gun. This is much faster, but it makes an unholy mess with strands of glue that get onto the front of the piece and ruin it unless you’re super careful. When you start the line of glue, a big glob comes out, which you then have to try to spread with the tip so it doesn’t glop out and make a mess. Hot glue has bulk, so it’s hard to make the glued-down edges sit flat.
There are supposed “precision” hot glue guns, but every brand is extremely cheaply made and unreliable. The one with the great reputation and high price is coasting on that reputation after redesigning their products to slash production costs. Read the negative reviews, which are consistent in the problems they report, specifically backflow and fragility.
I tried finishing the pieces with acrylic protective spray, but that failed — it ruins the image from an inkjet print. It might work if you have a color laser printer. I haven’t tried other sealants.
If you have other suggestions, please comment below!