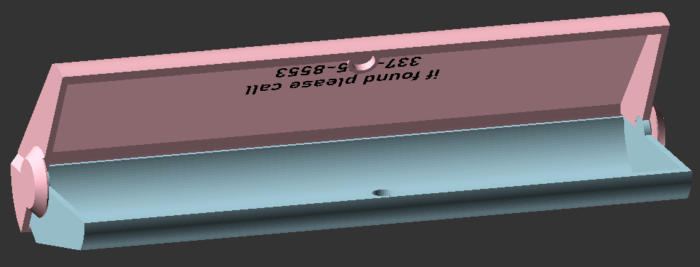
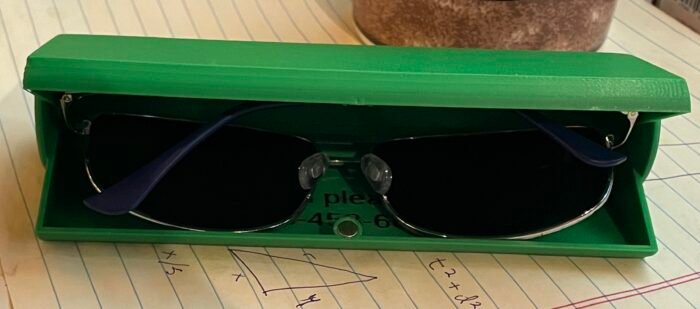
This post contains an OpenSCAD script for creating a custom-sized eyeglasses case for 3D-printing. The case has a magnetic closure, and can be operated one-handed by squeezing the hinged long edge to open, or the open edge to close it. It makes a satisfying click when you do this. In case you tend to lose things, the script gives the ability to print custom text on the inside or outside of the case, so you can add a phone number or other note (this requires a multi-color printer). You can also, of course, scribble on it with a Sharpie.
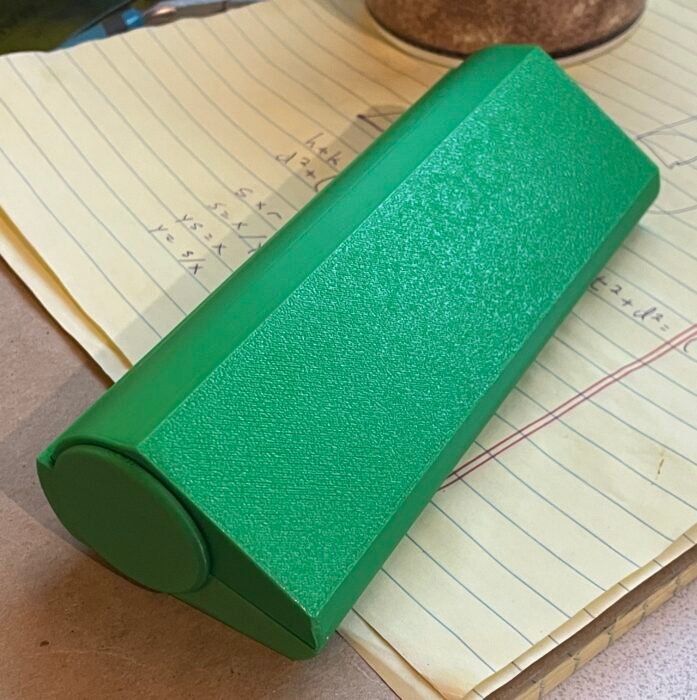
This is designed to print as two pieces which you snap together, and glue magnets into the prepared holes. When printed in the default orientation, this will not require supports. Depending how good your base layer adhesion is, you may want a brim (rabbit ears should do).
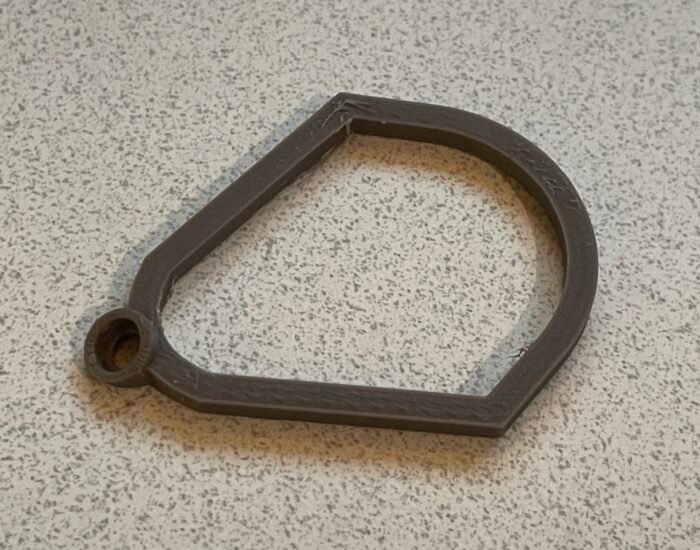
To find the correct dimensional parameters without printing a whole case, there’s an option to print a sizing guide. This is basically a cross-section of the case — if you can pass the glasses through the hole, they should fit in the case (assuming you have made it wide enough). The sizing guide also prints a sample magnet holder, so you can check that the magnet fits. Depending on the “slant” of the case, based on thicknesses you select, the magnet hole is printed at an angle, which may require the hole to be a little larger to accommodate the magnet than would be the case if it were printed level.
If you want to line the inside with a cleaning cloth or something, adjust the parameters to allow a little extra space. If you’re concerned about preventing the lenses getting scratched, though, typical 3D-printing materials aren’t hard enough for that to be a problem.
The default magnet sizing parameters will fit these little round magnets from Amazon. They’re an appropriate choice for this project — strong enough to keep the case from opening by accident, but not so much to make it hard to open. If you don’t have a way to use up the hundreds of other magnets in an order, try these bad boys from Bambu Labs, which are more expensive per unit but available in smaller quantities, at the same size and strength.
To use this code
Here’s a guide on how to use OpenSCAD in general, step by step from script to physical object. For this project, you will need the BOSL2 library, which is explained there.
As an alternative to installing the OpenSCAD client on your computer, you can instead go to the copy of this project on Makerworld and use their Customize button to run the script online.
Download the code
Customizer Parameters
All measurements are in millimeters.
When using the script to create a customized glasses case, whether online or in the OpenSCAD client, the following parameters are available.
Display and Section fields.
Display: Several choices for the display field let you see the parts in their open and closed configuration, as well as disassembled and laid flat for printing.
Use the print display mode to get the two parts in their optimal orientation fro printing. The open mode is for you to look at. It shows the case open to its greatest extent. The closed mode shows it shut. You can also use the top only, bottom only, and text only options to export the parts of the case as separate STL files that you can assemble in the slicer. See the multicolor printing guidelines for background on how to make use of these files. That’s also a useful document if you’re seeking to understand the organization of the script code.
The sizing guide display mode creates a loop shape which is the cross section of the glasses case interior. If you’re in any doubt whether you have the dimensions right, download and print this. If you can pass the glasses through this hole, you’re probably good on the dimensions. This sizing loop also has a magnet holder on it, to make sure the hole is tight around the magnet but not too tight.
Section: This checkbox cuts slices out of the glasses case at strategic locations to let you check for part clearances and make sure no objects intersect each other. You wouldn’t want to export this, and shouldn’t need to use it. It’s for me, for debugging.
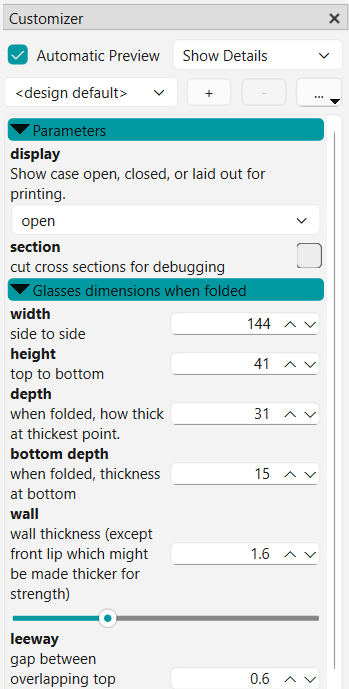
Glasses dimensions section
Under this heading, the following parameters:
- width is the measurement across the front of the glasses when folded. Allow maybe an extra 2mm just so the fit isn’t too snug.
- height is the glasses measurement from top to bottom when folded, including the stem ends if they protrude below the bottom of the frame. This measurement, also, don’t make too tight, because you don’t want to have to argue with the glasses to get them to clear the rim.
- depth is the thickness of the glasses at their thickest point when folded — usually near the height of the bridge. Here is where you can make the measurement just a little tight, because glasses are a bit flexible, and this thick part will be up near the hinge end of the case, where the case can apply a little pressure to keep the glasses from rattling around, without being forced open.
- bottom depth is the diameter of the rounded shape near the lip of the case, where the ends of the earpieces of the folded glasses will be. This generally doesn’t have to be large, but consider the shape of the glasses and their degree of curvature, and if in doubt, print the sizing guide to try.
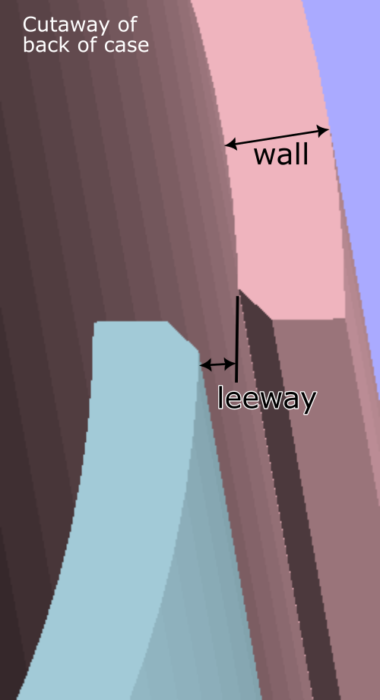
- wall setting is the thickness of the sides of the case. The default 1.6mm is good in general, but if you want a sturdier case, increase it. This thickness applies to every part of the case, except at the lip, which may be automatically widened to strengthen the case against warping, and the area around the hinge ends, which has to be a little thicker to accommodate the hinge and to strengthen that part of the case.
- leeway is the gap between the inner and outer curved sections at the hinge end. If it’s too small, the surfaces may scrape or the case may be hard to open.
- diamPeg is the diameter of the cone-shaped hinge pin at its thickest point. Unless you want extra strength in the hinge, there’s no reason to change this.
Magnets section
The script is design with cylindrical magnets in mind, and the default is for a popular size of 5mm x 2mm. The magnet size setting gives the size of the cylindrical opening you want to accommodate the magnets. It should allow a little extra for the diameter, because this cup is generally printed at a slant, so we lose a little diameter to the ridged-step edges of the hole. It doesn’t have to be deeper than the actual thickness of the magnet, and in fact you may want to make it very slightly shallower to make sure the magnets touch.
The magnets are normally in the middle of the front edge, where we expect there to be plenty of room because that’s where the opening for the wearer’s nose would go. Magnet position setting lets you opt instead to change this to a magnet at each corner. This is generally not a good idea because that’s where I expect the earpiece ends to go, but just in case you have weird glasses that will only fit in some odd orientation where the middle magnet posts would get in the way.
The $slop setting is an adjustment for printer precision. Because the printer is laying down lines of melty plastic, they can smoosh out a little, so when you print a thing (such as the hinge pins) that’s supposed to fit into a hole on another part (like the hinge pin holes), it makes sense to print the inside part a wee bit smaller than the outside to make sure they’re not going to be too tight.
Text section
If you want to add your phone number or other text to the case, this section gives you the settings for that.
By default, the text is on the inside of the case, on the theory that many people will not want their contact info on open display to strangers. However, you can use the text on outside checkbox to put it on the outer surface if you prefer.
You can enter up to two lines of text in the textline1 and textline2 fields. If you don’t want the label, leave them both blank.
The text depth setting is how deeply the text will be cut into the cover. Generally, one layer’s depth is enough. This minimizes the number of color changes during printing, and assuming it’s a sufficiently contrasting color to the case, it should be legible. You don’t need for people to be able to read it from across the room, you just need it to be noticeable and legible when they look closely.
The font size and fontFace settings let you set the height of the letters (in mm) and the font used. I recommend sans-serif fonts. Both the online customizer and the OpenSCAD client provide access to a list of font names and styles. In the client, use menu Window > Font List to open this list (or look for the tab where it might already be open).